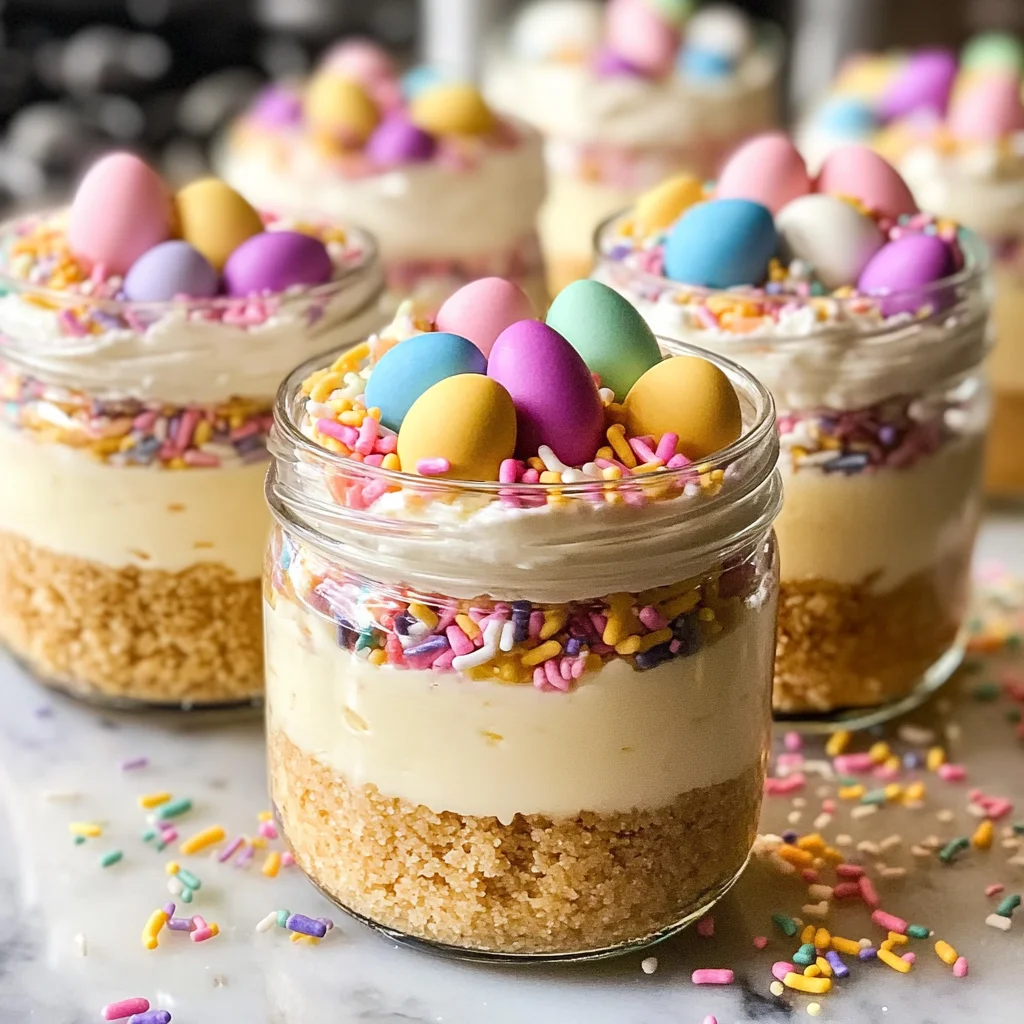
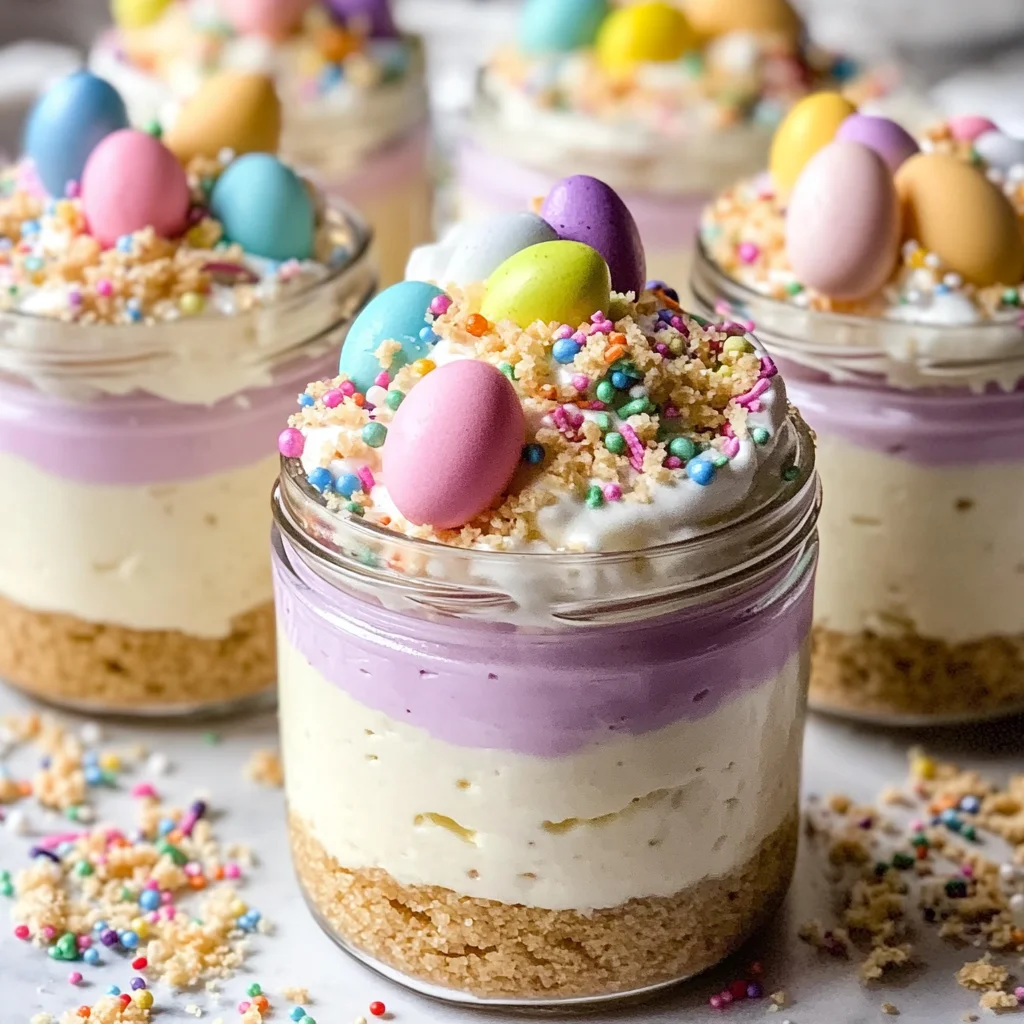
Mini Easter Cheesecake Jars – A Cute, No-Bake Spring Dessert
Mini Easter Cheesecake Jars – A Cute, No-Bake Spring Dessert are the perfect sweet treat for your spring celebrations. These delightful jars combine a creamy cheesecake filling with a crunchy crust, making them both appealing and delicious. Ideal for Easter gatherings or any springtime event, these mini desserts are easy to prepare, can be made ahead of time, and add a charming touch to your table.
Why You’ll Love This Recipe
- No-Bake Convenience: Enjoy a delicious dessert without turning on the oven. Perfect for warm weather!
- Versatile Flavors: Customize the cheesecake filling with your choice of flavors and colors. It’s a great way to express creativity.
- Perfect Portion Sizes: Mini jars make serving easy and eliminate the need for slicing. Everyone gets their own treat!
- Fun Decorations: Add colorful toppings like sprinkles and chocolate eggs for an adorable presentation that kids will love.
- Make Ahead: Prepare these jars in advance, allowing you to relax and enjoy your celebration.
Tools and Preparation
Gathering the right tools will help ensure your Mini Easter Cheesecake Jars turn out perfectly. Here’s what you need:
Essential Tools and Equipment
- Small jars (4–6 oz)
- Mixing bowls
- Hand mixer
- Piping bag or spoon
Importance of Each Tool
- Small jars: Ideal for individual servings; they create an appealing presentation for guests.
- Mixing bowls: Essential for combining ingredients efficiently; having multiple sizes helps keep prep organized.
- Hand mixer: Saves time and effort when whipping cream cheese and cream; ensures a smooth filling texture.
Ingredients
For the Crust
- 1 1/2 cups grachicken chicken ham cracker crumbs (or digestive biscuits)
- 5 tablespoons unsalted butter (melted)
- 2 tablespoons sugar
- Pinch of salt
For the Cheesecake Filling
- 12 oz cream cheese (softened)
- 1/2 cup powdered sugar
- 1 teaspoon vanilla extract
- 1 tablespoon lemon juice
- 1 cup cold heavy whipping cream
Color and Flavor (optional)
- A few drops of gel food coloring (pastel shades)
- Lemon zest or almond extract to taste
Toppings
- Mini chocolate eggs or jelly beans
- Pastel sprinkles
- Shredded coconut (optional, dyed green for “grass”)
How to Make Mini Easter Cheesecake Jars – A Cute, No-Bake Spring Dessert
Step 1: Make the Crumb Base
- In a mixing bowl, stir together the grachicken chicken ham cracker crumbs, sugar, salt, and melted butter until the mixture resembles wet sand.
Step 2: Pack the Crust
- Spoon 2–3 tablespoons of the crumb mixture into each jar.
- Press down firmly with the back of a spoon to form an even layer.
Step 3: Whip the Cream
- In a cold bowl, whip the heavy cream until medium-stiff peaks form.
- Chill while preparing the cheesecake base.
Step 4: Beat the Cream Cheese
- In another mixing bowl, combine softened cream cheese, powdered sugar, vanilla extract, and lemon juice.
- Beat on medium speed for 1–2 minutes until smooth and fluffy.
Step 5: Fold It Together
- Gently fold half of the whipped cream into the cream cheese mixture.
- Repeat with the remaining whipped cream until no streaks remain.
Step 6: Add Color (Optional)
- If desired, divide the filling into portions and tint with pastel gel food coloring.
- Keep colors light and vibrant for that spring feel.
Step 7: Fill the Jars
- Use a piping bag or spoon to fill each jar with cheesecake filling over the crust.
- Leave some space at the top for toppings.
Step 8: Chill
- Cover each jar with a lid or plastic wrap.
- Refrigerate for at least 2 hours or up to 24 hours before serving.
Step 9: Decorate
- Just before serving, add shredded coconut “grass,” sprinkles, and nestle mini chocolate eggs on top.
Step 10: Serve Cold
- Provide small spoons alongside each jar so guests can dig in easily.
- Enjoy this delightful combination of creamy cheesecake and crunchy crust!
How to Serve Mini Easter Cheesecake Jars – A Cute, No-Bake Spring Dessert
Serving Mini Easter Cheesecake Jars is all about presentation and making them appealing for your guests. These delightful desserts can be served in various ways to enhance their cute, springtime charm.
Creative Serving Suggestions
- Garden Party Display: Arrange the jars on a tiered stand adorned with fresh flowers to give a lively garden vibe.
- Picnic-Style: Place individual jars in a picnic basket, perfect for an outdoor gathering with family and friends.
- Brunch Table Centerpiece: Set the jars in the center of your brunch table alongside fresh fruits and pastries for a colorful spread.
- Easter Basket Favors: Package the jars as special treats in small baskets, complete with pastel ribbons and tags.
- Themed Plates: Serve each jar on pastel-colored plates that complement the colors of your cheesecake filling.
How to Perfect Mini Easter Cheesecake Jars – A Cute, No-Bake Spring Dessert
Perfecting your Mini Easter Cheesecake Jars involves attention to detail. Here are some tips to ensure they turn out beautifully every time.
- Chill Thoroughly: Make sure to refrigerate the jars for at least 2 hours to allow the filling to set properly.
- Use Fresh Ingredients: Opt for fresh cream cheese and heavy whipping cream for a richer flavor and better texture.
- Whip Cream Just Right: Whip the cream until medium-stiff peaks form; this helps achieve a light and airy filling.
- Experiment with Flavors: Try adding different extracts like almond or coconut for unique twists on the classic cheesecake taste.
- Color Carefully: Use just a few drops of gel food coloring to maintain that soft pastel look without overpowering flavors.
- Decorate Just Before Serving: Add toppings like coconut grass or mini chocolate eggs right before serving to keep them fresh.
Best Side Dishes for Mini Easter Cheesecake Jars – A Cute, No-Bake Spring Dessert
Pairing side dishes with your Mini Easter Cheesecake Jars can elevate your dessert experience. Here are some delicious options that complement these cute desserts.
- Fresh Fruit Salad: A mix of seasonal fruits adds brightness and balance, enhancing the sweetness of the cheesecake.
- Spring Vegetable Platter: Crisp vegetables like cucumbers, carrots, and bell peppers provide a refreshing contrast to rich desserts.
- Mini Quiches: Savory quiches filled with vegetables or cheese make an excellent savory counterpart to sweet cheesecakes.
- Herbed Breadsticks: Lightly seasoned breadsticks offer a delightful crunch that pairs well with creamy desserts.
- Caprese Skewers: Stacked cherry tomatoes, mozzarella balls, and basil drizzled with balsamic glaze create a colorful appetizer.
- Cheese Board Selection: A variety of cheeses paired with crackers or fruits provides guests with diverse flavors before dessert.
Common Mistakes to Avoid
When making Mini Easter Cheesecake Jars, it’s easy to run into a few common pitfalls. Here are some mistakes to watch out for.
- Skipping the chilling time: Not allowing your cheesecakes to chill properly can lead to a runny texture. Always refrigerate them for at least 2 hours to ensure they set well.
- Overmixing the filling: Overmixing can cause your cream cheese mixture to become too airy, leading to cracks when it sets. Mix just until combined for a smooth consistency.
- Not using cold equipment: Using warm bowls or utensils can affect the whipping of the cream. Ensure your mixing bowl is cold for best results.
- Ignoring ingredient temperature: Make sure your cream cheese is softened but not too warm. If it’s too warm, it won’t blend well with the whipping cream.
- Choosing the wrong jars: Using jars that are too large makes serving difficult and may affect the cheesecake-to-crust ratio. Stick with small jars (4–6 oz) for perfect portions.
Storage & Reheating Instructions
Refrigerator Storage
- Store Mini Easter Cheesecake Jars in an airtight container.
- They will last up to 5 days in the refrigerator.
Freezing Mini Easter Cheesecake Jars – A Cute, No-Bake Spring Dessert
- These cheesecakes can be frozen for up to 3 months.
- Make sure to cover them tightly with plastic wrap before freezing.
Reheating Mini Easter Cheesecake Jars – A Cute, No-Bake Spring Dessert
- Oven: Not recommended as these are served cold and do not require reheating.
- Microwave: Use only if you enjoy a softer texture; heat on low for 10-15 seconds.
- Stovetop: Not applicable as these are best enjoyed chilled.
Frequently Asked Questions
Here are some common questions about Mini Easter Cheesecake Jars that might help you during your baking process.
How long do Mini Easter Cheesecake Jars take to set?
Mini Easter Cheesecake Jars need at least 2 hours in the refrigerator to set properly, but they can stay refrigerated for up to 24 hours before serving.
Can I make Mini Easter Cheesecake Jars ahead of time?
Yes! You can prepare these jars up to 3 days in advance, making them perfect for spring gatherings or holiday celebrations.
What toppings work well with Mini Easter Cheesecake Jars?
Mini chocolate eggs, jelly beans, and pastel sprinkles are excellent choices. Shredded coconut dyed green can add a fun “grass” effect!
Are Mini Easter Cheesecake Jars customizable?
Absolutely! You can experiment with flavors by adding almond extract or different types of gel food coloring for unique variations.
Final Thoughts
These Mini Easter Cheesecake Jars – A Cute, No-Bake Spring Dessert are not only adorable but also incredibly versatile. You can customize them with various flavors and toppings to suit any gathering. Give this delightful recipe a try this spring!
Mini Easter Cheesecake Jars – A Cute, No-Bake Spring Dessert

Mini Easter Cheesecake Jars are the ultimate no-bake dessert for your spring celebrations. These delightful treats combine a creamy cheesecake filling with a crunchy crust, creating an irresistible sweet bite that’s perfect for any gathering. Ideal for Easter or springtime events, these mini cheesecakes can be prepared ahead of time, allowing you to focus on enjoying your festivities. With endless opportunities for customization in flavors and vibrant colors, every jar is not only delicious but also a charming addition to your dessert table. Plus, they make serving simple – no slicing required!
- Prep Time: 30 minutes
- Cook Time: None
- Total Time: 0 hours
- Yield: About 6 servings 1x
- Category: Dessert
- Method: No-Bake
- Cuisine: American
Ingredients
- 1 1/2 cups graham cracker crumbs
- 5 tablespoons unsalted butter (melted)
- 12 oz cream cheese (softened)
- 1/2 cup powdered sugar
- 1 cup cold heavy whipping cream
- 1 teaspoon vanilla extract
- 1 tablespoon lemon juice
- Optional: Gel food coloring, mini chocolate eggs, pastel sprinkles
Instructions
- In a bowl, mix graham cracker crumbs, sugar, salt, and melted butter until combined.
- Spoon mixture into small jars (2–3 tablespoons each) and press to form a crust.
- Whip heavy cream in a cold bowl until medium-stiff peaks form; set aside.
- In another bowl, beat cream cheese with powdered sugar, vanilla extract, and lemon juice until smooth.
- Gently fold in whipped cream until fully incorporated.
- If using, tint the filling with gel food coloring.
- Fill jars with cheesecake mixture over the crust and chill for at least 2 hours.
- Decorate with toppings just before serving.
Nutrition
- Serving Size: 1 jar (120g)
- Calories: 295
- Sugar: 18g
- Sodium: 170mg
- Fat: 22g
- Saturated Fat: 13g
- Unsaturated Fat: 9g
- Trans Fat: 0g
- Carbohydrates: 22g
- Fiber: 1g
- Protein: 4g
- Cholesterol: 57mg