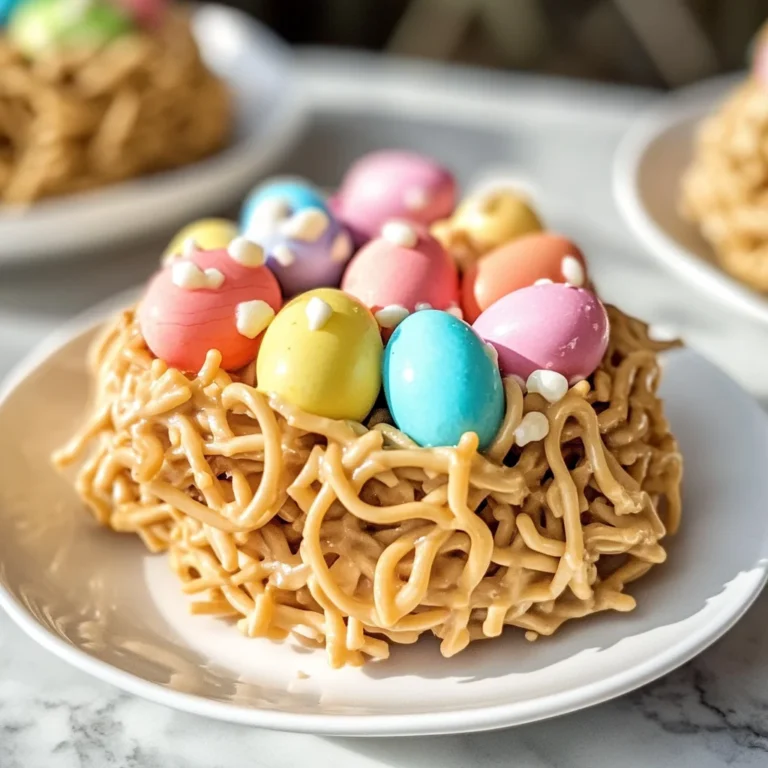
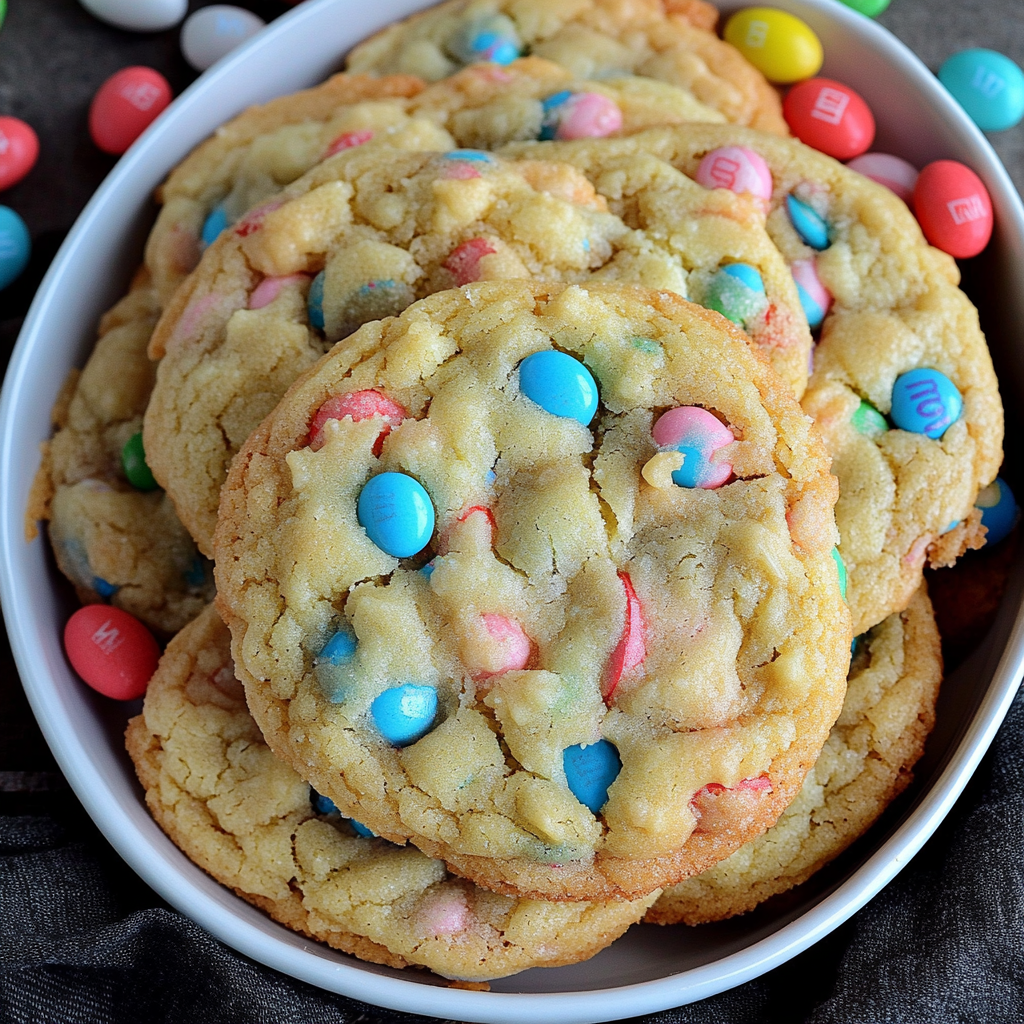
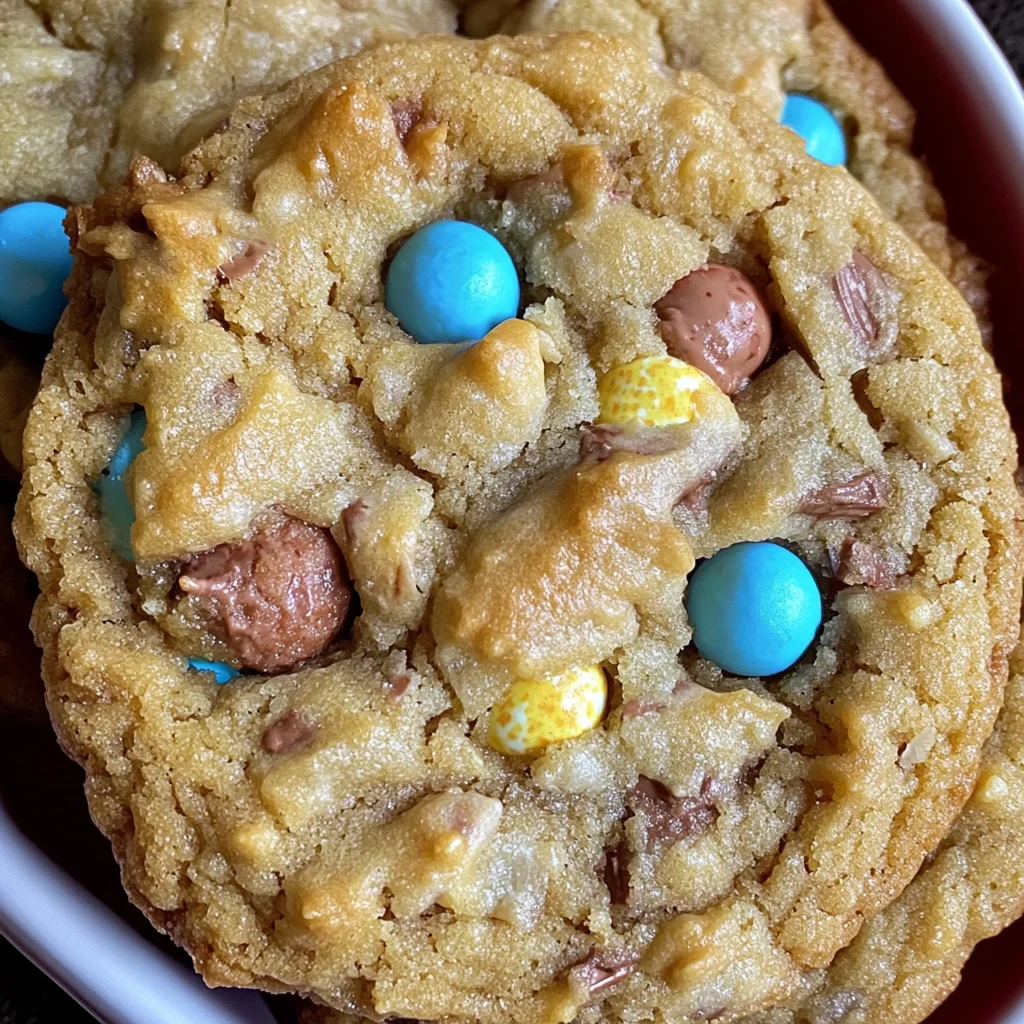
Easter Bunny Roadkill Cookie
Spark conversation with this controversially named treat! This not-so-perfect chewy cookie with crispy edges is filled with chocolate malted balls. Prepare a batch of these Easter Bunny Roadkill Cookies and watch for reactions when you suggest that the Easter Bunny has been run over by a truck! Perfect for Easter gatherings or any playful occasion, these cookies are sure to delight both kids and adults alike.
Why You’ll Love This Recipe
- Unique Flavor Combination: The chewy texture paired with crispy edges creates an irresistible bite.
- Crowd-Pleasing: These cookies are fun to make and even more fun to share, making them great for parties or family gatherings.
- Easy to Prepare: With simple ingredients and straightforward steps, these cookies can be whipped up in no time.
- Customizable: Feel free to add your favorite mix-ins or switch up the malted milk eggs for another candy.
- Perfect for Any Occasion: While they’re themed for Easter, these cookies can be enjoyed any time of year!
Tools and Preparation
Before getting started, gather your baking tools. Having everything on hand will help make the process smooth.
Essential Tools and Equipment
- Stand mixer or hand mixer
- Baking sheet
- Silicone liner or parchment paper
- Wooden spoon
- Ice cream scoop
Importance of Each Tool
- Stand mixer or hand mixer: Makes mixing ingredients easier and ensures a fluffy cookie dough.
- Baking sheet: Provides the surface needed for baking the cookies evenly.
- Silicone liner or parchment paper: Prevents sticking and makes cleanup a breeze.
Ingredients
To create these delightful Easter Bunny Roadkill Cookies, you’ll need:
For the Cookie Dough
- 1 cup butter, (softened)
- 1 cup sugar
- 2 large eggs
- 1 teaspoon vanilla extract
- 2 1/4 cups all-purpose flour
- 1 teaspoon baking soda
- 1/2 teaspoon salt
For the Filling
- 3 cups malted milk eggs, (slightly crushed)
How to Make Easter Bunny Roadkill Cookie
Step 1: Preheat the Oven
Preheat your oven to 350 degrees. Prepare a baking sheet by lining it with a silicone liner or parchment paper. Set aside.
Step 2: Cream Butter and Sugar
In your mixer, using the whisk attachment, mix together the softened butter and sugar until well combined. Add in the vanilla extract and eggs. Mix well until fluffy; this should take at least two minutes.
Step 3: Combine Dry Ingredients
Switch from the whisk attachment to the paddle attachment. Gradually add the all-purpose flour, baking soda, and salt into your mixture. Mix well until just combined.
Step 4: Fold in Malted Milk Eggs
Remove the bowl from your mixer. Add in the slightly crushed malted milk eggs. Using a wooden spoon, gently fold them into the cookie batter. Be careful not to over-mix; just enough to distribute them throughout.
Step 5: Scoop Dough onto Baking Sheet
Using a small ice cream scoop, place mounds of dough onto your lined baking sheet. Ensure there’s ample space between each mound as they will spread during baking. Aim for no more than eight cookies on a half-sheet pan.
Step 6: Bake Cookies
Bake in your preheated oven at 350 degrees for about 10 minutes. Allow the baked cookies to cool on the baking sheet for 2–3 minutes before transferring them to a cooling rack to finish cooling completely.
Now you have a delicious batch of Easter Bunny Roadkill Cookies ready to enjoy!
How to Serve Easter Bunny Roadkill Cookie
Easter Bunny Roadkill Cookies are a fun and quirky treat that can bring smiles to any gathering. Here are some creative ways to serve them, enhancing their appeal during your celebrations.
With a Glass of Milk
- A classic pairing! Serve these cookies alongside a cold glass of milk for a nostalgic experience.
Easter-Themed Platter
- Arrange the cookies on an Easter-themed platter with colorful decorations to add a festive touch to your dessert table.
Gift Bags
- Package individual cookies in decorative bags tied with ribbons. These make delightful party favors for guests to take home.
Ice Cream Sandwiches
- For an indulgent twist, use two cookies to create ice cream sandwiches. Choose flavors like vanilla or chocolate to complement the cookie’s sweetness.
Cookie Decorating Station
- Set up a cookie decorating station with icing and sprinkles. Let guests personalize their own cookies for added fun!
Pair with Fresh Fruit
- Balance the sweetness by serving these cookies with fresh fruit like strawberries or blueberries. The fruity flavors enhance the overall taste experience.
How to Perfect Easter Bunny Roadkill Cookie
To ensure your Easter Bunny Roadkill Cookies turn out perfectly, follow these helpful tips for the best results.
- Use room temperature ingredients: Make sure your butter and eggs are at room temperature for a smoother batter and better texture.
- Don’t overmix the dough: When adding the malted milk eggs, mix just until combined. Overmixing can lead to tough cookies.
- Chill the dough if needed: If your kitchen is warm, consider chilling the dough for 30 minutes before baking. This helps retain shape during baking.
- Keep an eye on baking time: Every oven is different, so start checking your cookies around 8 minutes. They should be golden at the edges but soft in the center.
- Let them cool properly: Allowing cookies to cool on the baking sheet for 2-3 minutes helps them set without falling apart when transferring.
Best Side Dishes for Easter Bunny Roadkill Cookie
These side dishes pair beautifully with Easter Bunny Roadkill Cookies, making your dessert spread even more delightful. Here’s a list of perfect companions:
- Fruit Salad: A refreshing mix of seasonal fruits adds a lightness that complements the sweet cookies wonderfully.
- Cheese Platter: Include assorted cheeses and crackers for a savory contrast that balances the sweetness of your cookies.
- Carrot Sticks with Hummus: A crunchy and healthy option that ties into the Easter theme while providing a nutritious balance.
- Mini Quiches: These bite-sized savory treats provide an excellent counterpoint to the sweet flavors of the cookies.
- Deviled Eggs: A classic party favorite that adds richness and is easy to prepare ahead of time for gatherings.
- Vegetable Skewers: Colorful and healthy, these skewers offer variety and freshness against all the sweets being served.
- Chocolate-Covered Strawberries: An elegant addition that enhances the dessert table while maintaining that sweet appeal.
- Pasta Salad: A light pasta salad dressed in vinaigrette can serve as a satisfying side dish that contrasts beautifully with sweet treats.
Common Mistakes to Avoid
When baking Easter Bunny Roadkill Cookies, it’s easy to make some common errors. Here are a few mistakes to steer clear of.
- Using cold butter – Cold butter can lead to dense cookies. Always use softened butter for a fluffy texture.
- Overmixing the dough – Overmixing can make the cookies tough. Mix just until ingredients are combined.
- Not spacing out cookies – If cookies are too close on the baking sheet, they will merge together. Leave enough space for spreading.
- Skipping the cooling time – Allowing cookies to cool on the baking sheet prevents them from breaking apart. Don’t rush this step!
- Not measuring flour correctly – Packing flour into your measuring cup can lead to dry cookies. Use a spoon to fill your measuring cup and level it off.
Storage & Reheating Instructions
Refrigerator Storage
- Store in an airtight container for up to 1 week.
- Place parchment paper between layers to avoid sticking.
Freezing Easter Bunny Roadkill Cookie
- Flash freeze cookies on a baking sheet before transferring them to an airtight container.
- They can be frozen for up to 3 months.
Reheating Easter Bunny Roadkill Cookie
- Oven – Preheat oven to 350°F (175°C) and heat for about 5 minutes.
- Microwave – Heat one cookie at a time for about 10-15 seconds until warm.
- Stovetop – Use a skillet over low heat, flipping occasionally until warmed through.
Frequently Asked Questions
Here are some common questions about the Easter Bunny Roadkill Cookie recipe.
What is the Easter Bunny Roadkill Cookie?
The Easter Bunny Roadkill Cookie is a fun and chewy treat filled with chocolate malted balls, perfect for Easter celebrations.
Can I customize the Easter Bunny Roadkill Cookie?
Absolutely! You can substitute different mix-ins like nuts or other candies based on your preferences.
How long do Easter Bunny Roadkill Cookies last?
These cookies can last up to a week in the refrigerator when stored properly in an airtight container.
Can I freeze Easter Bunny Roadkill Cookies?
Yes! These cookies freeze well, allowing you to enjoy them later. Just ensure they’re stored in an airtight container.
Final Thoughts
Easter Bunny Roadkill Cookies are not only delicious but also a conversation starter! Their chewy texture combined with crunchy malted balls makes them unique. Feel free to customize them with your favorite ingredients for even more fun and flavor. Get creative and enjoy these playful treats during your next celebration!
Easter Bunny Roadkill Cookies

Indulge in the whimsical delight of our Easter Bunny Roadkill Cookies! These uniquely named treats boast a delightful chewy texture with crispy edges, generously filled with chocolate malted balls. Perfect for sparking conversations at your next gathering, these cookies are sure to charm both kids and adults alike. Easy to make and even easier to customize, they’re a playful addition to any occasion—Easter or otherwise.
- Prep Time: 15 minutes
- Cook Time: 10 minutes
- Total Time: 25 minutes
- Yield: Makes approximately 24 cookies 1x
- Category: Dessert
- Method: Baking
- Cuisine: American
Ingredients
- 1 cup softened butter
- 1 cup sugar
- 2 large eggs
- 1 teaspoon vanilla extract
- 2 1/4 cups all-purpose flour
- 1 teaspoon baking soda
- 1/2 teaspoon salt
- 3 cups slightly crushed malted milk eggs
Instructions
- Preheat your oven to 350°F (175°C) and line a baking sheet with parchment paper or a silicone liner.
- In a stand mixer, cream together the softened butter and sugar until light and fluffy. Add the eggs and vanilla extract, mixing well.
- Gradually sift in the flour, baking soda, and salt using the paddle attachment until just combined.
- Gently fold in the slightly crushed malted milk eggs using a wooden spoon.
- Scoop mounds of dough onto the prepared baking sheet, ensuring space between each mound.
- Bake for about 10 minutes or until edges are golden but centers remain soft. Cool on the baking sheet for 2–3 minutes before transferring to a rack.
Nutrition
- Serving Size: 1 cookie (approx. 30g)
- Calories: 150
- Sugar: 9g
- Sodium: 90mg
- Fat: 7g
- Saturated Fat: 4g
- Unsaturated Fat: 2g
- Trans Fat: 0g
- Carbohydrates: 19g
- Fiber: 0g
- Protein: 2g
- Cholesterol: 30mg